
In this unit, we'll explore the world of procedure texts and how to create clear, easy-to-follow instructions. Whether you're explaining how to cook a meal, assemble a product, or solve a problem, writing a step-by-step guide is a valuable skill. We will focus on using imperative sentences and organizing instructions in a way that makes them simple to understand and follow.
Mission 1. Preparing for the Unexpected
Read the Procedure Text carefully, which explains how to create an emergency preparedness plan for natural disasters. After reading, answer the comprehension questions to test your understanding of the text. Reflect on the importance of preparing for natural disasters and how it helps protect lives and property.
How to Create a Basic Emergency Preparedness Plan for Natural Disasters
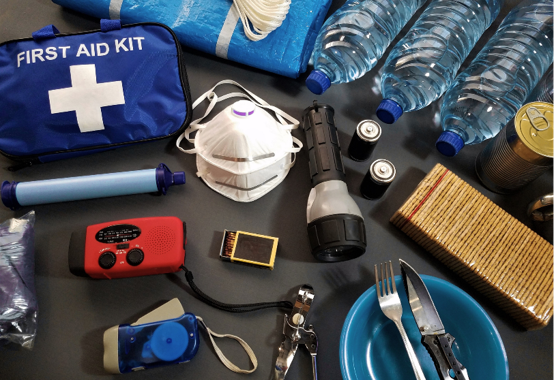
Natural disasters, such as floods, earthquakes, and hurricanes, can strike without warning, causing significant damage to lives, property, and communities. In many cases, the severity of the impact can be reduced through proper preparedness and planning. Having an emergency preparedness plan in place ensures that you and your loved ones are ready to respond quickly and effectively during a crisis. Whether it's having an emergency kit, knowing evacuation routes, or staying informed, taking proactive steps before disaster strikes can make all the difference. Preparedness not only saves lives but also helps communities recover more quickly, minimizing long-term damage. Goal: To prepare for natural disasters by having an emergency plan in place that can help you and your family stay safe during a crisis. Materials: • Emergency contact list (family members, friends, neighbors) • Flashlights and batteries • First aid kit • Water and non-perishable food • Important documents (insurance papers, IDs, medical records) • Blankets and warm clothing • Emergency bag or container Steps: 1. Identify possible natural disasters (Clue: The first step in preparing for a disaster). Research and identify the types of natural disasters most likely to occur in your area (e.g., floods, hurricanes, earthquakes, wildfires). This will help you plan for specific needs. 2. Create an emergency contact list (Clue: To keep your loved ones informed). Write down the names, phone numbers, and addresses of important contacts such as family members, friends, neighbors, and local emergency services. Make sure everyone in your family knows how to reach each other. 3. Prepare an emergency kit (Clue: To have necessary supplies on hand). Gather the essentials you'll need during an emergency. This should include: flashlights and extra batteries, first aid kit, enough water and non-perishable food for at least 3 days, blankets and warm clothing, necessary medications and personal hygiene items, and important documents in a waterproof bag (IDs, insurance papers, medical records). 4. Create an evacuation plan (Clue: Knowing where to go and how to leave safely). Plan the safest routes to evacuate your home and community. Ensure that everyone in your family knows the best routes and where to go in case of evacuation (e.g., a relative's house or an emergency shelter). 5. Designate a safe meeting point (Clue: To stay connected with family members). Choose a safe location away from your home where family members can meet in case of evacuation. Make sure this meeting point is known to everyone in the household. 6. Practice emergency drills (Clue: To be prepared when the situation arises). Regularly practice emergency drills with your family to ensure everyone knows how to react during different types of disasters. Practice evacuation procedures, first aid basics, and how to use emergency equipment. 7. Stay informed (Clue: To receive real-time updates during a disaster). Stay updated by listening to local news, weather stations, or using emergency apps on your phone. Sign up for emergency alerts to receive real-time warnings about natural disasters in your area. 8. Review and update your plan regularly (Clue: To ensure your plan remains effective). Review your emergency preparedness plan every few months to make sure all information is up-to-date and that your emergency kit is stocked and ready. Update contact numbers, check the expiration of supplies, and adjust plans based on new risks or family needs. Answer these questions: 1. What is the first step in creating an emergency preparedness plan? 2. Why is it important to regularly practice emergency drills with your family? 3. What is the purpose of having a designated meeting point during a disaster? 4. How does having a preparedness plan reduce the risks and impact of natural disasters? 5. What would happen if people did not have an emergency preparedness plan during a natural disaster?
Mission 2. Learn and Apply the Process of Recycled Paper
Study the poster carefully, which outlines the procedure for making recycled paper from old newspapers. Pay attention to the materials required and the step-by-step instructions provided. Then, read the conversation between Siti and Rizky, where they explain the process using imperative sentences and time-order words. After studying the poster and dialogue, answer the questions that follow.
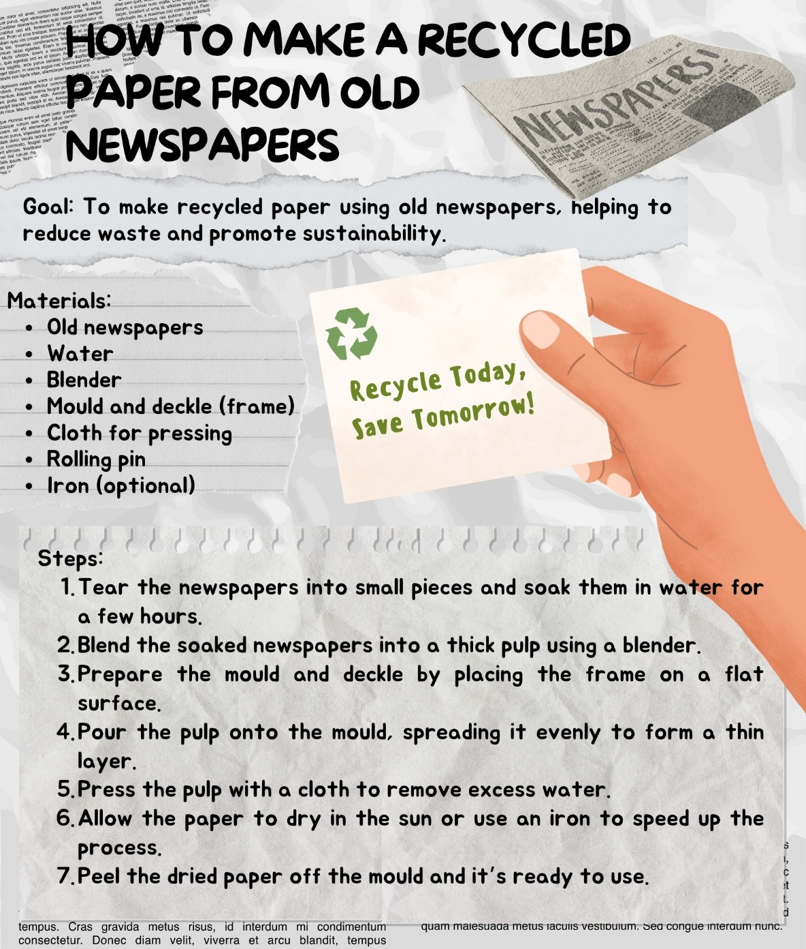
Siti: Hey, Rizky! Check out this cool poster about recycling paper. It shows how we can make new paper from old newspapers. Rizky: Wow, that's a great way to recycle! So, what's the first step in making recycled paper? Siti: The first step is to tear the newspapers into small pieces and soak them in water for a few hours. This softens the paper, so it's easier to turn it into pulp. Rizky: Oh, I see! And then we blend the soaked newspapers into a pulp, right? How do we do that? Siti: Exactly! You use a blender to mix the soaked paper into a thick, mushy pulp. It's important to blend it well to get an even texture. Rizky: I've never used a mould and deckle before. What are they for? Siti: Good question! The mould and deckle are the frames where we pour the pulp. The deckle helps create the edges, while the mould forms the shape of the paper. Once the pulp is evenly spread, you press it to remove excess water. Rizky: Got it! And after that, we just need to dry the paper, right? How do we dry it quickly? Siti: Yes, you can either let it dry in the sun or use an iron to speed up the drying process. Once it's dry, you can peel it off and it's ready to use! Rizky: That sounds like fun! How long do you think it takes to make recycled paper? Siti: Well, soaking and blending take about 30 minutes. The drying part depends on how thick the paper is and whether you're drying it in the sun or using an iron. But overall, it's pretty quick! Rizky: I love this idea! It's such a simple way to recycle and make something useful. Plus, it reduces waste. I think I'll try it at home. After reading the poster and understanding the conversation, answer the questions below. 1. Have you ever recycled paper or other materials at home or at school? If so, what was the process like? 2. What do you think are the benefits of recycling, and how can recycling paper help reduce pollution and climate change? 3. What other household items do you think can be recycled or reused in a creative way? How can we apply similar steps from the procedure to recycle those items? 4. Why is it important to soak the newspaper in water before blending it? 5. What role do the mould and deckle play in the process of making recycled paper? 6. How does using an iron speed up the drying process? 7. How does recycling paper help the environment?
Mission 3. Fact or False?
Read the conversation about the procedure for making compost from kitchen waste. Then, determine whether the statements provided are true or false based on the steps outlined in the procedure.
Siti: Hey, Rico! I've started composting at home to help reduce waste. It's amazing how easy it is and how it benefits the environment. Have you ever tried making compost? Rico: I haven't tried it yet, but I've heard it's great for the garden. What do you need to get started? Siti: It's super simple! You just need to collect kitchen scraps like vegetable peels, fruit rinds, coffee grounds, eggshells, and even tea bags. I also add some yard waste, like leaves and grass clippings. Rico: That sounds like a good way to recycle food waste! Do you just throw everything together in a pile? Siti: Not exactly. The first thing you need to do is layer the materials. I start with a layer of coarse materials, like twigs or straw, at the bottom of the pile. Then, I add my kitchen scraps, followed by a layer of soil. It helps with aeration and makes the composting process faster. Rico: Oh, I see! So, after layering the materials, is it okay to just leave it there and wait? Siti: Well, not exactly. To speed up the process, you need to turn the compost regularly, at least once a week. This ensures that air flows through the pile and helps everything break down more quickly. Rico: That makes sense. How do I know when the compost is ready to use? Siti: Good question! It usually takes a few months to decompose, but it depends on how often you turn it and keep it moist. When it's ready, the compost should look dark, crumbly, and smell like earth—it should no longer smell like food scraps. Rico: Sounds like a long process. Can you speed it up somehow? Siti: Yes! You can speed up composting by making sure it stays moist and well-aerated. If you add too much food waste at once, it might get too wet and slow down the process. I also make sure to add brown materials like leaves to balance out the moisture from food scraps. Rico: That sounds simple enough. And once it's ready, I can use it in the garden, right? Siti: Exactly! The compost is full of nutrients that help improve the soil and retain moisture in your garden. It's a great way to give back to the earth and grow healthier plants. Rico: I'm definitely going to try this! It sounds like a simple way to reduce waste and be more sustainable at home.
Statement Check
| Statement | True/False |
|---|---|
Mission 4. Boost Your Learning
Read the poster carefully, which provides tips on effective study habits. After reviewing the tips, answer the questions that follow based on the information presented in the poster. Be sure to reflect on how each tip can improve your study routine.
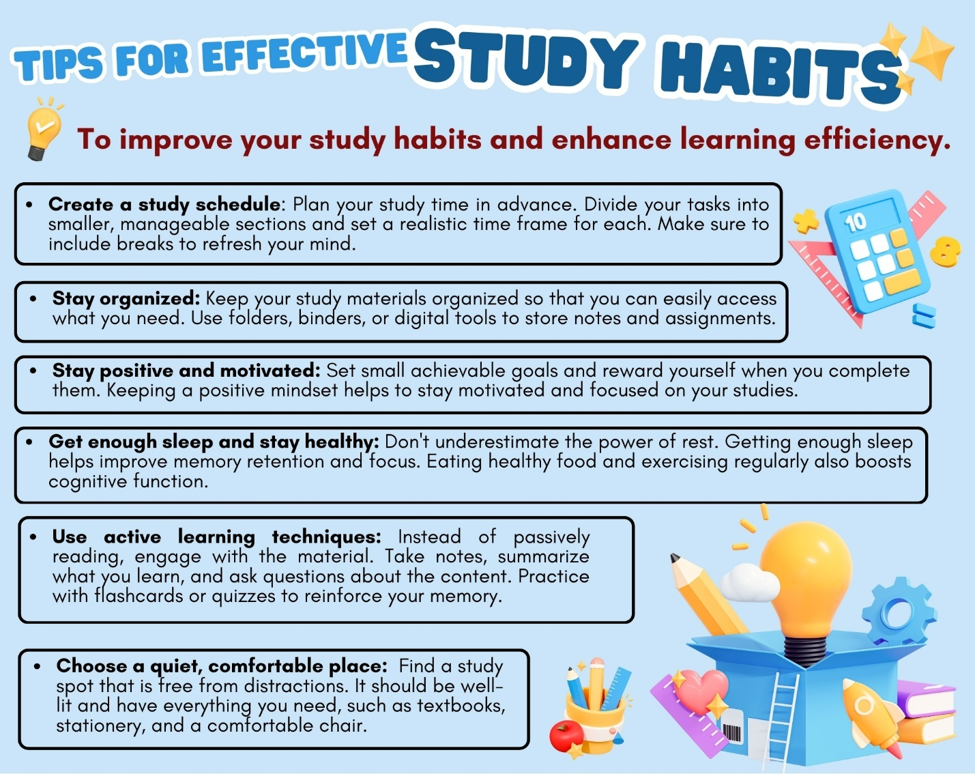
1. Which of these tips do you think will help you most in improving your own study habits? Why? 2. Have you ever struggled with staying focused while studying? How might these tips help you overcome that? 3. What other tips or strategies do you think could improve study habits? 4. Why is getting enough sleep important for studying? 5. How can setting small achievable goals help with studying?
Mission 5. Explore Effective Study Habits
Read the Procedure Text on Study Habits from the previous mission (mission 4) carefully. Match each tip to the correct explanation by drawing a line between the tip and explanation. Afterward, discuss your answers with a partner or in small groups.
| Tip | Explanation |
|---|---|
A procedure text is a type of writing that provides a clear set of instructions or guidelines for performing a specific task or process. The main goal of a procedure text is to guide the reader through a series of actions, explaining step-by-step how to do something. These texts are commonly used in everyday life for activities such as cooking, assembling furniture, or performing any task that requires clear, organized instructions. Structure of a Procedure Text: Goal/Title: This is the first part of the procedure. It introduces what the reader will accomplish or the purpose of the instructions. Example: "How to Make a Cup of Tea" or "How to Assemble a Bookshelf." Materials/Ingredients: A list of all the things you need to complete the procedure. Example: "Ingredients: Tea bags, water, sugar (optional), milk (optional)." Steps/Instructions: This is the most crucial part of the procedure. Example: "1. Boil water in a kettle. 2. Place a tea bag in a cup. 3. Pour hot water over the tea bag." Types of Procedure Texts: Manuals (Instructional Procedures): A manual is a detailed document that provides step-by-step instructions for assembling, using, or maintaining something. Manuals are often used for products such as appliances, electronics, or furniture. Characteristics of a Manual: clear and detailed instructions to follow; step-by-step format; often includes illustrations or diagrams to assist the user; may include warnings or safety instructions for the proper use of the item. Example of a Manual — Title: "How to Assemble a Dining Table". Materials: table legs, screws, screwdriver, etc. Steps: lay the tabletop face down on a soft surface; attach the four legs to the table, aligning the holes with the screws provided; tighten the screws using a screwdriver; flip the table over carefully and check stability. Purpose of a Manual: Manuals are typically used to assemble or operate items correctly. They aim to prevent mistakes, reduce damage, and provide clear guidance to ensure the proper use of a product. Tips (Informational Procedures): Tips are general suggestions or advice on how to perform a task or improve a process. Unlike manuals, which are often very detailed, tips are often brief and more flexible. Characteristics of Tips: short, easy-to-understand sentences; may include helpful hints, suggestions, or recommendations; not necessarily sequential, unlike a step-by-step procedure; focus on general advice or best practices. Example of Tips — Title: "Tips for Better Sleep". Tip 1: Avoid caffeine late in the afternoon. Tip 2: Establish a relaxing bedtime routine. Tip 3: Keep your bedroom dark and quiet. Purpose of Tips: Tips provide practical advice and useful information to improve how we do things or help us find shortcuts. They are not as detailed as manuals but still provide value by offering insightful suggestions.
Mission 6. Sequence the Steps: A Baking Challenge
Read the conversation carefully as it explains the steps to complete a task. After reading, rearrange the scrambled procedure steps by writing the numbers of the correct procedure steps in the correct order next to each sentence.
Lia: Hey, Aditya! My birthday is coming up, and I want to bake a cake, but I've never baked one before. Do you know how to do it? Aditya: Sure, I can help! It's actually pretty simple. The first thing you need to do is preheat the oven to 180°C. This way, it'll be ready when you need to bake the cake. Lia: Ah, I see! Preheating the oven is important. What should I do after that? Aditya: Next, you need to gather all your ingredients. For a simple cake, you'll need flour, sugar, baking powder, eggs, butter, milk, and a little vanilla extract. Lia: Okay, I've got all the ingredients. What's the first step after that? Aditya: Great! First, you should mix the dry ingredients. In a bowl, combine the flour, sugar, baking powder, and a pinch of salt. Stir them together so they're evenly mixed. Lia: Okay, I'm doing that. Do I need to sift the flour or anything? Aditya: If you want to make sure there are no lumps, it's a good idea to sift the flour before mixing. It makes the batter smoother. Lia: Got it! So, after mixing the dry ingredients, what's next? Aditya: Now it's time to add the wet ingredients. In another bowl, whisk the eggs, then add the milk, melted butter, and vanilla extract. Stir it all together until it's smooth. Lia: Got it! After mixing the wet ingredients, should I combine them with the dry ingredients? Aditya: Exactly! Now, gradually add the wet mixture to the dry ingredients, stirring as you go. Keep mixing until everything is well combined, and the batter becomes smooth and thick. Lia: Alright, I've got the batter ready. What's next? Aditya: The next step is to grease the cake pan. You can use butter or cooking spray to coat the pan to prevent the cake from sticking. Lia: Got it. So, do I just pour the batter directly into the pan now? Aditya: Yes, pour the batter evenly into the greased pan. Make sure the surface is flat and level. You don't want any uneven cooking. Lia: Okay, I'm ready. How long should I bake the cake? Aditya: Place the pan in the preheated oven and bake for about 25-30 minutes. Check the cake by inserting a toothpick in the center. If it comes out clean, the cake is ready. Lia: What if I don't have a toothpick? Can I use something else? Aditya: You can use a fork or a knife. The important thing is to check that the center is fully cooked, and it doesn't come out wet. Lia: Got it! How do I know when it's completely done? Aditya: After baking, you should gently press the top of the cake. If it bounces back, it's done. Also, the edges of the cake will start to pull away from the sides of the pan. Lia: Perfect! What should I do after it's baked? Aditya: Once it's done, take the cake out of the oven carefully. Let it cool for about 10-15 minutes in the pan. After that, turn it out onto a wire rack to cool completely. Lia: Why should I cool it in the pan first? Aditya: Letting it cool in the pan helps it settle and keeps its shape. If you remove it too soon, the cake might fall apart or break. Lia: Okay, I'll be patient! How long does it take to cool completely? Aditya: It takes about 30 minutes to an hour, depending on the cake's thickness. Once it's cool, you can decorate it with frosting, fruits, or whatever you like. Lia: Awesome! Thanks for all the tips, Aditya! I can't wait to bake it.
Scrambled Procedure Steps
| Procedure Step | Correct Order |
|---|---|
Mission 7. Identifying the Dos and Don'ts
Read the procedure text on "How to Live More Sustainably" carefully. After reading, create a list of the dos (things you should do) and don'ts (things you should avoid) based on the advice provided in the text.
How to Live More Sustainably
Goal: To adopt a more sustainable lifestyle that reduces environmental impact and conserves resources. Tips: 1. Reduce your plastic use: One of the most effective ways to live sustainably is to minimize your use of plastic. Avoid single-use plastics like straws, water bottles, and packaging. Instead, choose reusable alternatives such as cloth bags, metal water bottles, and glass containers. 2. Choose energy-efficient appliances: When upgrading your home, choose energy-efficient appliances that use less energy and reduce your electricity bills. Look for products with Energy Star ratings. Don't leave appliances on standby; always turn them off when not in use to save energy. 3. Opt for public transport or biking: Driving less can significantly reduce your carbon footprint. Use public transportation or ride a bicycle instead of using your car for short trips. If you must drive, try to carpool to reduce the number of vehicles on the road. 4. Grow your own food: Starting a small garden at home can reduce your reliance on store-bought produce, which often involves significant environmental costs in terms of packaging and transportation. Grow your own vegetables and compost food scraps to create nutrient-rich soil for your garden. 5. Support local and sustainable brands: When shopping, try to buy from local vendors who use sustainable practices. Don't support companies that engage in harmful environmental practices, such as those involved in deforestation or excessive packaging. Always research the brands you buy from. 6. Minimize waste: Aim to reduce waste by buying in bulk, choosing products with minimal packaging, and recycling materials. Don't throw items away that can be recycled or reused. Make sure to sort your waste properly to ensure that it's processed correctly. Based on the procedure text above, list the do's and don'ts related to living more sustainably.
| Do's (Things You Should Do) | Don'ts (Things You Should Avoid) |
|---|---|
In a procedure text, time-order words (also called sequence markers or transitional words) are used to indicate the order in which tasks should be completed. These words help guide the reader through the steps of the process, making it easier to follow and understand the sequence of actions. Time-order words: To Begin/Start — First / To begin with / Initially. To Continue/Move to the Next Step — Next / Then / After that. To Show Simultaneous Actions — Meanwhile / At the same time / While. To Complete or Finish the Process — Finally / In the end / To finish. An imperative sentence is a type of sentence that gives a command, request, or instruction. In a procedure text, imperative sentences are used to clearly and directly tell the reader what to do at each step of the process. Why Use Imperative Sentences? Clear Instructions: Imperative sentences are direct and leave no room for ambiguity, making them perfect for giving instructions. Action-Oriented: These sentences encourage the reader to take immediate action. Efficiency: They are concise, which is important in procedure texts, as the reader needs to act quickly and correctly. Characteristics of Imperative Sentences: They do not have a subject because the subject is understood (the subject is usually "you"). They are typically direct and to the point, making the instruction clear and concise. Imperative verbs are used to give commands or instructions, such as "mix," "turn," "add," "stir," "pour," and "cut." Examples of Imperative Sentences in Procedure Texts: Add the sugar to the mixture and stir well. Pour the batter into the cake pan. Turn off the stove when the food is ready.
Mission 8. Fill in the Steps
Read the procedure text carefully, which explains how to make a healthy smoothie. Fill in the blanks with the correct time-order words and imperative sentences. Pay attention to the sequence of steps in the recipe and use the appropriate action verbs for each step.
How to Make a Healthy Smoothie
In today's fast-paced world, it's becoming increasingly difficult to eat nutritious meals that are both quick and easy to prepare. Many people look for simple solutions to maintain a healthy lifestyle without spending too much time in the kitchen. One great way to stay healthy is by drinking smoothies, which are packed with essential vitamins and minerals. Not only are smoothies refreshing, but they can also be a delicious way to incorporate fruits, vegetables, and protein into your diet. Making a homemade smoothie is an easy, quick, and fun process that anyone can follow. In the following guide, you'll learn the step-by-step procedure to make a tasty, healthy smoothie in just a few minutes. This guide will show you how to make a delicious smoothie by following a simple and healthy recipe. You'll be able to create a smooth and creamy drink that is not only tasty but also packed with nutrients. Step 1: First, _______ all your necessary ingredients. You will need fresh fruits like bananas, berries, or mangoes, as well as yogurt or a plant-based substitute, milk or fruit juice, and a handful of ice cubes. Step 2: ________, _______ the fruit thoroughly to eliminate any contaminants, dirt, or pesticides. If you are using fruits like grapes or berries, ________ any stems before proceeding. Once cleaned, ________ the fruit into small chunks to facilitate easy blending. Step 3: ________, _______ the chopped fruit into the blender, making sure to distribute it evenly. This will form the base of your smoothie, so ensure the quantity aligns with your desired thickness and flavor. Step 4: ________, _______ in the yogurt and milk or juice. For a richer texture, add extra yogurt, or to achieve a thinner consistency, increase the amount of milk or juice. Feel free to adjust the proportions depending on your taste preferences. Step 5: ________, _______ a generous amount of ice cubes to the blender. The ice will contribute to the refreshingly cool taste and thick texture of the smoothie. Alternatively, ________ ice with frozen fruit for a creamier consistency. Step 6: ________, _______ the ingredients on high for about 30 seconds to 1 minute, or until the texture reaches a smooth and creamy consistency. ________ the consistency by checking for any remaining chunks and ________ more milk or juice if you prefer a runnier consistency. Step 7: ________ the smoothie by carefully pouring it into a glass. ________ it with additional fruits, a sprinkle of granola, or even a dash of honey for an extra touch of sweetness. Use the provided word box to fill in the missing words in the paragraph. Word box: Gather / Finally / Substitute / Wash / Then / Decorate / First / After that / Pour / Serve / Test / Remove / Meanwhile / Blend / Next / Add / Chop
Mission 9. Practice Time
In this mission, you will apply the concepts and skills you have just learned about procedure texts. Carefully follow the steps outlined below to complete the mission. Make sure to pay attention to the sequence of actions and use the appropriate time-order words and imperative sentences, as discussed. 1. Think of a simple process or tips that you know well and would like to explain. 2. Write your procedure text. Your text should include at least 6 steps. 3. Use time-order words to order your steps logically. 4. Each step should include at least one imperative sentence. 5. After completing your procedure text, review the text and check if it follows a clear sequence and if the imperative sentences are correctly used.
Gratis — tolong sebarkan
Materi dan latihan di sini bisa dipakai siapa saja tanpa membayar dan tanpa mendaftar. Aplikasi Fitri Learning membawa semuanya ke HP, lengkap dengan nilai dan pembahasan, dan jalan tanpa internet setelah diunduh sekali.
Gratis, tanpa akunUnduh aplikasinya → Ilmu yang bermanfaatBagikan ke WhatsApp